💡 Skip ahead to:
Introduction
Allxon Provisioning Playbook, an automated setup process of Plugins and OTA Artifacts, can significantly reduce the provisioning timeline of mass device fleets via a single unified portal. This article is an interface introduction, providing an overview of the functions available within this interface.
Playbook Editor
The Playbook Editor page is the first page that you will see when entering Allxon Fleet Provisioning Page. Here, you can find the unpublished Playbook that is still in editing mode. Navigate through the Provisioning Playbook Interface to familiarize yourself on how to build your customized playbook by adding, deleting and re-arranging sequences of Plugins and Artifacts. Finally, Publish the completed Provisioning Playbook that will be deployed across all future fleet devices.
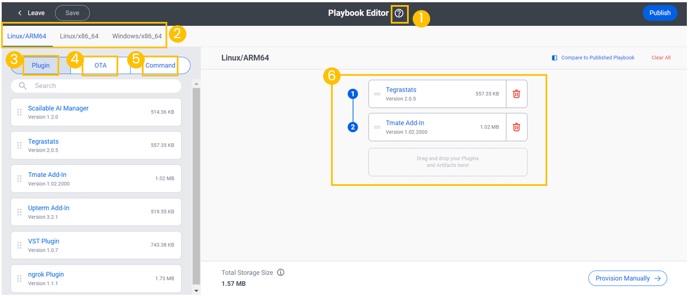
- Main Interface
- Click
to see the Playbook Editor Step-by-Step Guide
- Select a compatible OS/Architecture: LinuxARMS64/Linux/x86_64/Windows/x86
- Click on the Plugin tab to open the Plugin list.
- Click on the OTA tab to open the OTA Artifact list.
- Click on the Command tab to open the command list.
- Perform drag & drop, rearrange & delete options for both Plugins and Artifacts to the Playbook on the right-hand side.
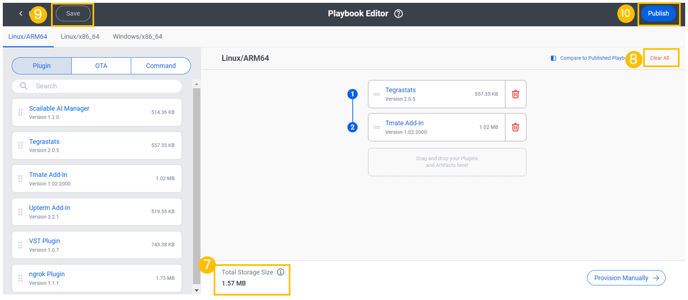
- See the estimated Total Storage Size of the playbook
- Clear All to delete all actions made in Playbook Editor
- Save all current actions made.
- Publish to complete Provisioning Playbook set up. The Provisioning Playbook will now be automatically applied to all new devices added in Allxon Portal.


- Provision Manually
Test run provisioning of device fleets before clicking Publish to validate the execution of your Playbook. Once Plugins and Artifacts have been successfully uploaded and edited in the Playbook, select the Provision Manually button. Choose either single or mass fleet devices to start manually test running Provisioning Playbook.

Provisioning Playbook
- Overview Tab
The Overview tab opens up the General Information column. Here, you can view the most recent edits that have been made and the most updated provisioning status to your Playbook.
Enable Auto Provisioning
- Enable Auto Provisioning
- Disable Auto Provisioning
When auto provisioning is enabled, a green Enabled status appears under General
The Action button also enables you to view the status history of all Published and Unpublished playbooks when you open the Auto Provisioning Status History window from the View Status History button.
Detailed searches can be filtered by:
- Date and Time
- Status: Published/Disabled/Enabled
(3.) Provision Manually for Published Provisioning Playbooks
- Manually provision Published Playbooks to single or mass device fleets that are already in the group by clicking on the Provision Manually Tab.
- A pop-up window will appear with the available devices that can be manually Provisioned.
- Provisioning Activity Tab
By clicking on the Provisioning Activity tab, you can view all activities exercised for this Playbook. Additionally, the filter drop-down bar reveals even more specific search options:
Provision Status: Complete/Processing
Provision Type: Manual/Auto
Detailed information for Published Playbooks is displayed in a Provisioning Details pop-up window. Open the by hovering over the "Task" column and clicking on the column.
More Tips
- Restore Back to Published Playbook:
Once the Playbook has been successfully published, you can go directly back to the Playbook Editor main page to make some changes. If any unwanted changes are made here, simply click on the Restore to Published Playbook to revert back to the original published playbook version.

- Compare Published and Unpublished Playbooks:
When you are making changes to the Playbook, you can compare it with the successfully published Playbook by clicking on the Compare to Published Playbook button. A Published Playbook window will pop up next to the editing Playbook window for easy comparison.


👉🏻 Learn more: Provisioning Playbook Step-by-Step Guide
